A key step in fabric design is being able to create a seamless repeat. In this tutorial I’ll walk through a method to create a seamless repeat using Photoshop Elements (the steps are quite similar if you’re using Photoshop).
I started with this photo of a rooster (taken on a recent trip to Hawaii). Note how the background is different in each of the 4 corners — this is what needs to be fixed to create the seamless repeat. The photo on the right shows the photo in repeat, with the edges very distinct from one tile to the next.
1. Open your file in Photoshop Elements. Crop the image and make any adjustments you’d like to the photo. The photo will be one tile of your repeat pattern. It’s good for peace of mind to always create a duplicate layer just in case you mess up the photo too much and want to start over.
2. Note the size of your image in pixels (Image –>Resize –>Image Size). For my photo, the image size is 1000 pixels by 750 pixels.
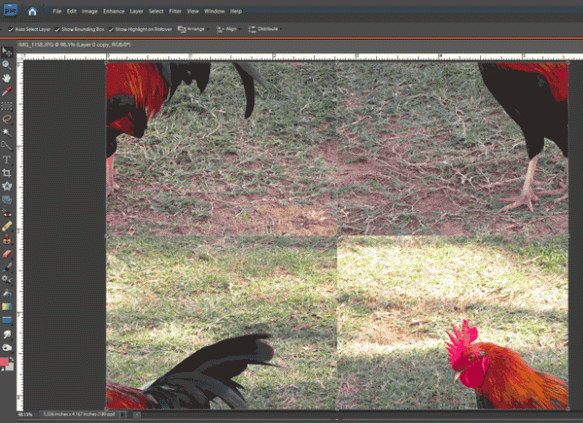
3. In this step, we’ll “cut” the photo in half both horizontally and vertically. This will show us where the edges and corners are mismatched and need fixing. From the menu, choose Filter–>Other–>Offset. In the pop-up box, divide the width of your image, in pixels, by 2 and type the number in the Horizontal offset box. Then divide your image’s height by 2 and type the number in the Vertical offset box.
The result shows the photo “cut” up and pasted back together, and there are two clear lines through the middle vertically and horizontally where the photo doesn’t blend seamlessly.
4. In this step we’ll fix these edges. There are several different tools in Photoshop Elements you can use to make these edits, depending on your photo and your preferences. There’s the clone stamp tool, smudge tool, and paint brush tool. I used the healing brush tool. Using a series of small fixes, I blended the two sides of each edge to remove the harsh transition.
In this photo, the edges all occur in the photo’s background, so there aren’t any really distinct features. If you’re working with an image where there are distinct lines across the edges, these need to be fixed carefully so that the repeat ends up seamless. Here’s the photo (or tile) after all the edges were cleaned up.
6. At this point, if you’re done with your image, or if you just want to see how it looks in a repeat, the next step is to define the repeat pattern. Do this from the menu: Edit–>Define Pattern, and save it with any name you’d like. Then, create a new blank file in Photoshop Elements. Make sure it’s large enough to show at least 2 tiles both horizontally and vertically. From the menu, choose Edit–>Fill Layer. In the pop-up (shown below on the right) in the Contents section, choose to use Pattern from the drop-down list, and then select your new pattern from the Custom Pattern list, then click OK.
This tile creates the following repeat pattern, and the tile edges are pretty much gone.


