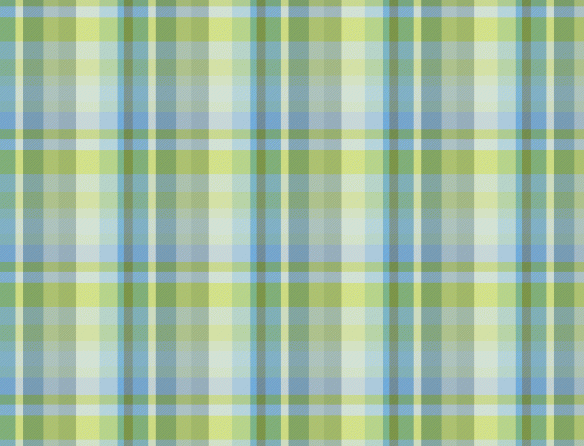
A plaid, or Tartan, pattern consists of criss-crossing bands of different color threads in the lengthwise (warp) and crosswise (weft) orientations. The distinctive diagonal lines in plaids are created by weaving in a twill pattern. To create a plaid effect in Photoshop Elements we need to be able to mimic the twill weaving pattern. (Tartan photo below courtesy of Wikipedia.)

There are 3 stages in creating a plaid — setting up the twill weave pattern, defining the colors for your warp and weft, and finally putting these together to create the plaid.
Part One–Creating the Twill Weave Pattern
1. Start by creating a new blank file in Photoshop Elements with a size of 4 pixels by 4 pixels–this is a tiny file. Zoom in so you can see the file. Set up the grid (Edit –> Preferences –> Grid) to be 1 pixel. Make sure the grid is visible (View–> Grid is checked) and that “snap to grid” is checked on (View –> Snap to –> Grid).
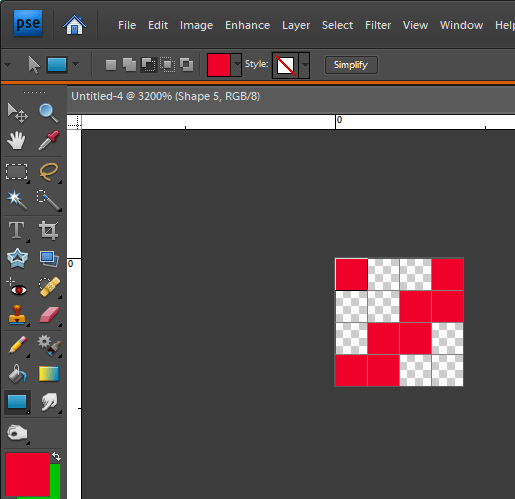
2. The picture below shows the new blank file with the grid showing. Select the rectangle tool.
3. Drag your mouse to create a rectangle covering the two bottom left squares of the grid. Since the “snap to grid” feature is turned on, the rectangle tool will easily match the grid lines.
4. Continue drawing rectangles to form the pattern shown below. This is the full pattern for the diagonal twill weave.
x
x
x
x
x
x
x
x
x
x
5. The weave pattern is in multiple layers, so we need to flatten it to one layer. The command is: Layer–> Flatten Image.
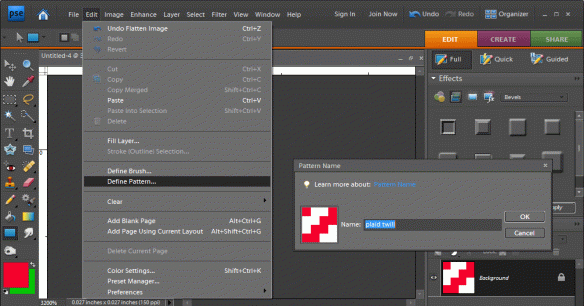
6. The last step in creating the twill weave is to define this as a pattern that can be used in other files. The command is: Edit–> Define Pattern, and then give the pattern a name in the pop-up box. We’ll come back to this pattern after we create the Warp and Weft.
Part Two–Creating the Warp and Weft Patterns
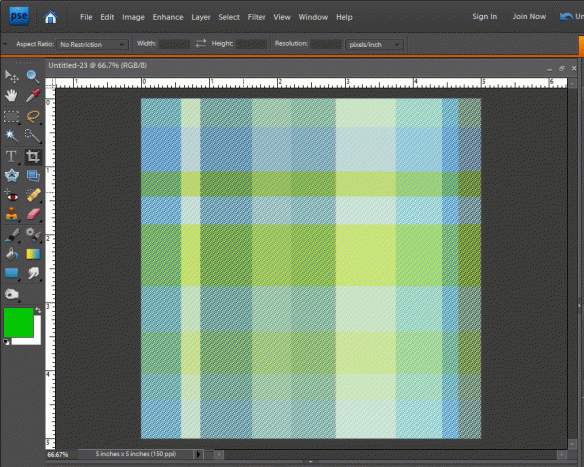
7. Starting with the warp pattern, create a new file with the width that you want for your plaid warp. In this example I’m using a 5 inch file. Using the rectangle tool, draw a vertical rectangle and fill it with the color of your choice.
8. Continue to add rectangles until the entire area is filled.
9. When happy with the colors, define the warp pattern: Edit–> Define Pattern, and give the pattern a name.
10. Next, repeat this for the weft, but this time creating horizontal stripes.
11. And define the weft pattern: File –> Define Pattern, and give the pattern a name.
Part Three–Creating the Plaid
To create the plaid, we’ll start with a new file and fill it with the Twill weave pattern. Then we’ll replace the Twill weave pattern with the warp and the weft colors.
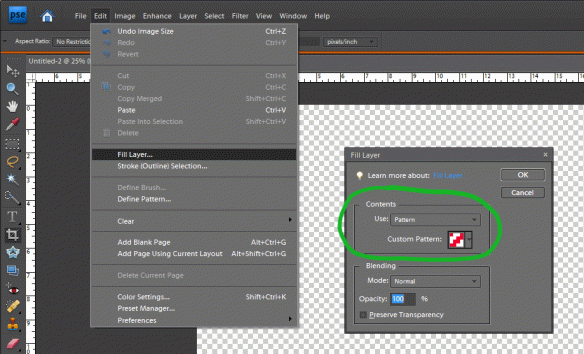
12. Create a new blank file. I made one 22 inches by 18 inches to give an overall view of the resulting plaid pattern. Fill the file with the Twill weave pattern: Edit–> Fill Layer. In the pop-up box, in the “Contents” section, select Pattern from the “Use” drop-down list, and then select your plaid pattern from the Custom Pattern list.
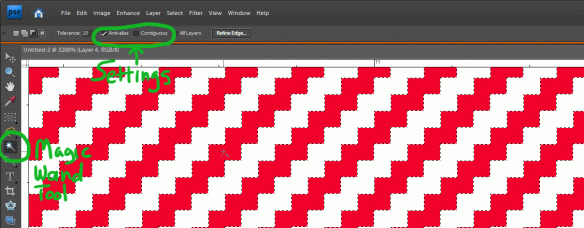
13. This fills your file with the diagonal lines of the Twill pattern. Zoom in enough so that the lines are distinct. Using the magic wand tool, select one of the colored lines. Make sure that the Magic Wand settings are as shown in the picture below. This will select all the red diagonal lines.
14. Replace the red diagonal lines with your warp pattern: Edit–> Fill Selection and choose your warp pattern from the list.
15. The diagonal stripes are now filled with the warp colors. Next is to fill in the weft. The first step is to select the area to fill with the weft: Select–> Inverse will select the parts of your file that weren’t filled in by the warp colors.
16. Then fill it with the weft pattern: Edit–> Fill Selection and choose your weft pattern (same as step 14).
17. Finally, deselect any pixels (Select–> Deselect) and zoom out to view your plaid (click on the image below to enlarge it–it looks much better).
Create a Seamless Repeating Tile
In order to use your plaid as a fill in a background or as a fabric design, you need to create a seamlessly repeating tile of your plaid. To do this, set up a new file with the exact dimensions of your warp and weft patterns (both 5 inches in my example). Then, following steps 12 through 16 above, fill the file with the twill weave pattern and then with the warp and weft patterns. This creates one repeat of your plaid.
Save this file, and also save it as its own pattern: Edit–> Define Pattern and name the pattern. You can now use this pattern as a fill in any size file in Photoshop Elements. You can upload the file to a printing service (such as Spoonflower.com) and print fabric with your plaid design.
Examples of other plaids
Here’s a blue version of the plaid which uses the warp from the previous plaid, and then the same blues for the weft.
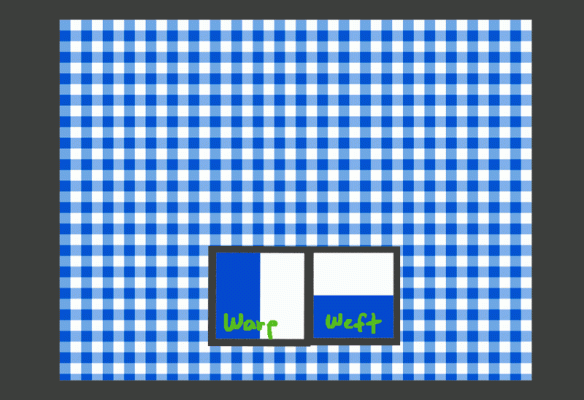
Here’s a gingham created using the same twill weave pattern and the simple warp and weft shown below.
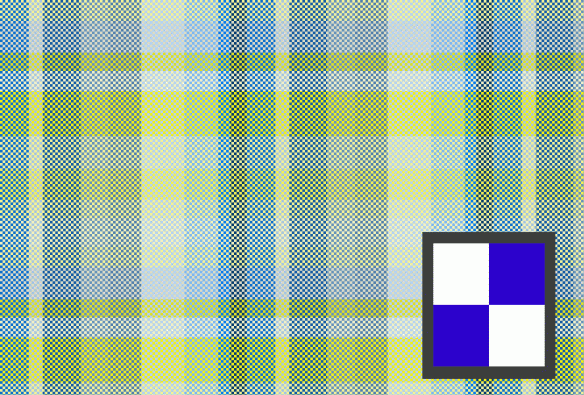
You can also use different patterns for the weave (steps 1 through 6 above). Here’s an example of the same warp and weft, but using a checkerboard pattern for the weave (zoom in to see the checkerboard effect more clearly).
Once you can accept the universe as being something expanding into an infinite nothing which is something, wearing stripes with plaid is easy. — Albert Einstein
Plaid shirts and striped pants rarely make a positive fashion statement. — the Paperclip helper from Microsoft Word Documents








Thank you! You do some amazing things with photoshop and are very kind to share them with us.
wonderful……now-a-days whatever doubt comes into my mind about PS and Ai i jumps into coloroncloth….u helped me a lot…thanq very much,…:)
What a great resource! Thanks for the time making this tutorial!!
Fantastic!!! Thank you so much!